Hello! For several months now, I've been thinking about making a bed for my daughter. Here's a video and my comments to encourage you to embark on a similar project!
You can do almost the entire project with this blog and the video, but I also put together a PDF with detailed plans. It has a small cost, but I believe you will find it extra helpful!
If you are not a member of this newsletter, subscribe now to get a welcome discount code of 50% for our community on my blueprints and online products.
Montessori Bed Plans / Blueprints
The pdf includes :
- All measurements
- Detailed views from every angle
- Final measurements part list
- Assembly steps
OK, let's get started!
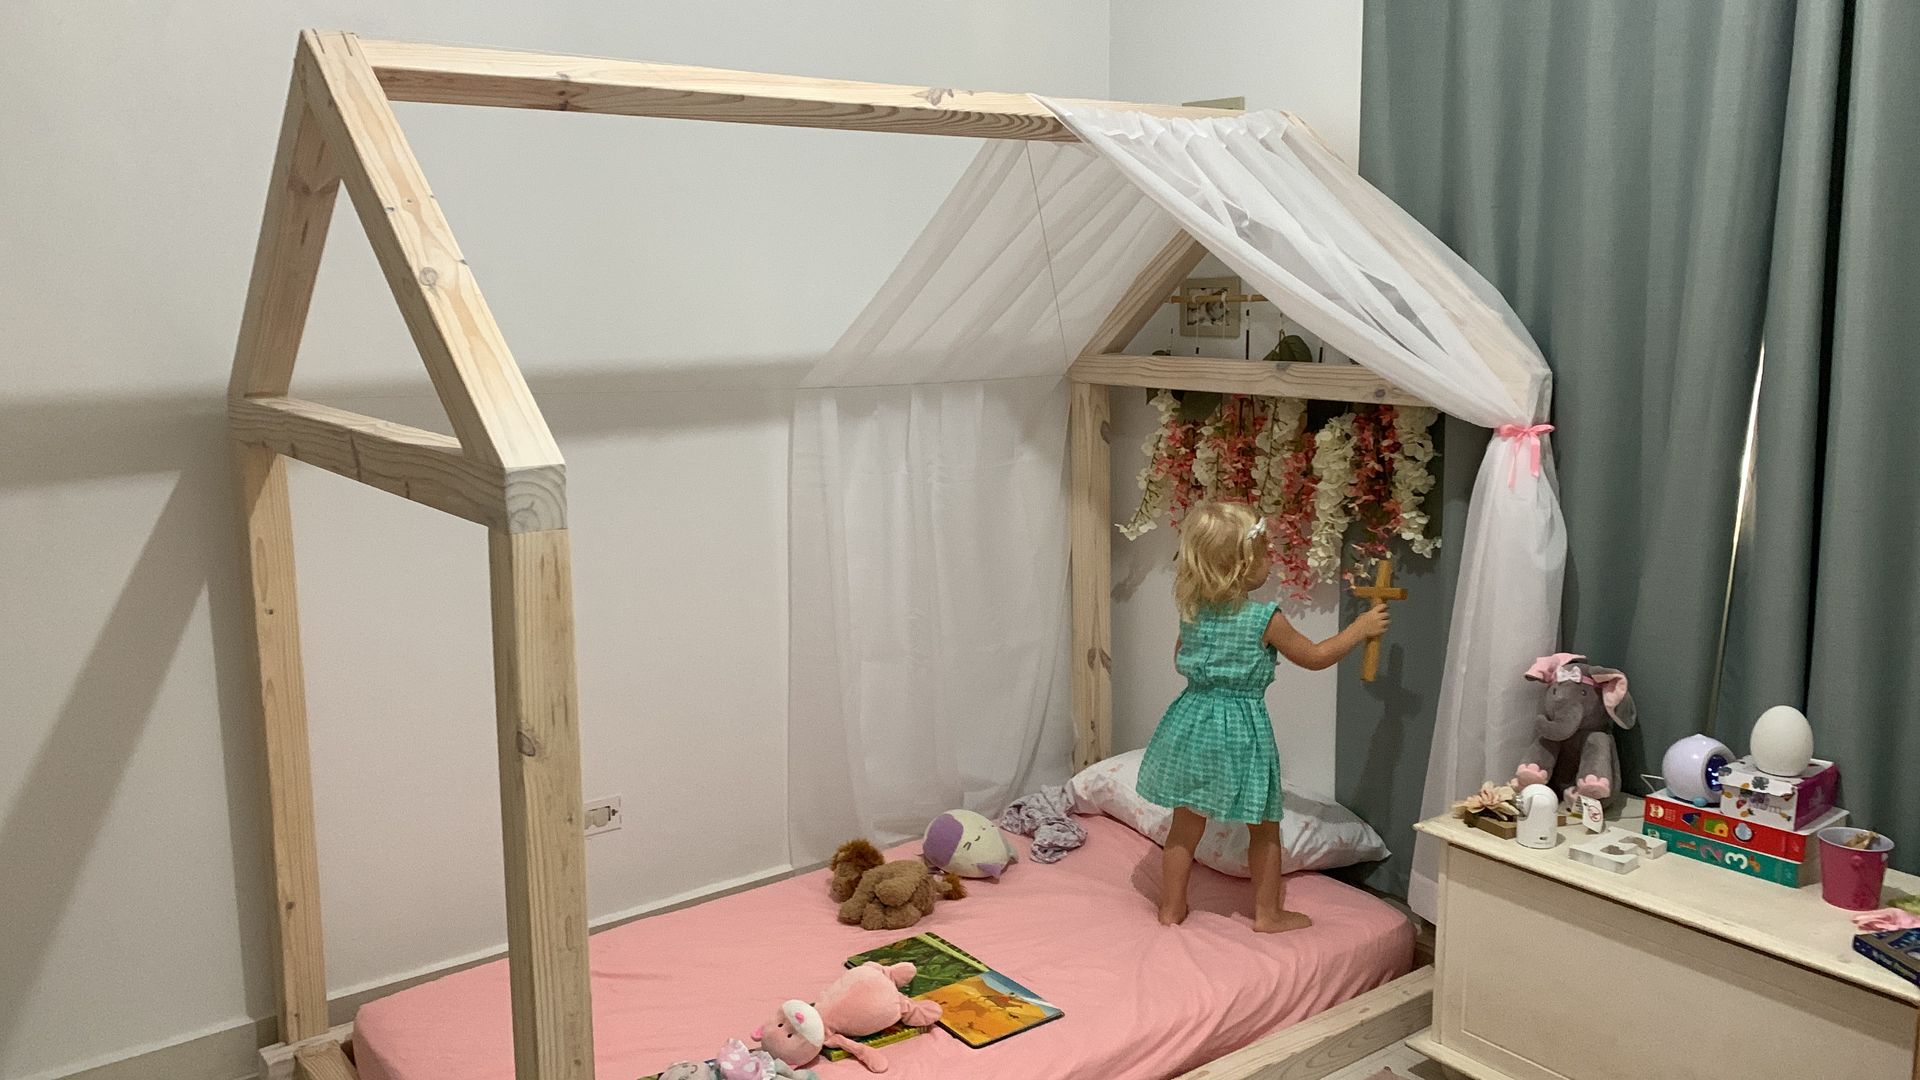
The Montessori bed I'm going to make in this video is quite simple but durable. The best part is that you can make it in your own home on a very low budget. Throughout the process, you'll learn some basic woodworking techniques.
I had two options for this project: making an elaborate piece or simply a functional one and giving the bed to my daughter while my father-in-law was visiting. I chose the latter. This was the option that kept my wife happy, so there was nothing to discuss.
The bed is designed for a twin mattress (100 centimeters wide and 190 centimeters long) and was built with commercial pine wood that you can find at any hardware store.
Here's a list of what you'll need, both in terms of tools and materials.
Tools:
- Circular saw
- Jointer Plane #7 or #8
- Spokeshave
- Workbench
- Handsaw
- Orbital sander
- Sandpaper #80, #120, #220, and #320
- Odies Oil or your preferred finish.
Materials:
I recommend using this list as a guide and seeing what options you have with your local supplier. Most likely, the thickness will be greater than what I used, and in that case, you can do some simple math and adapt the project to the new measurements.
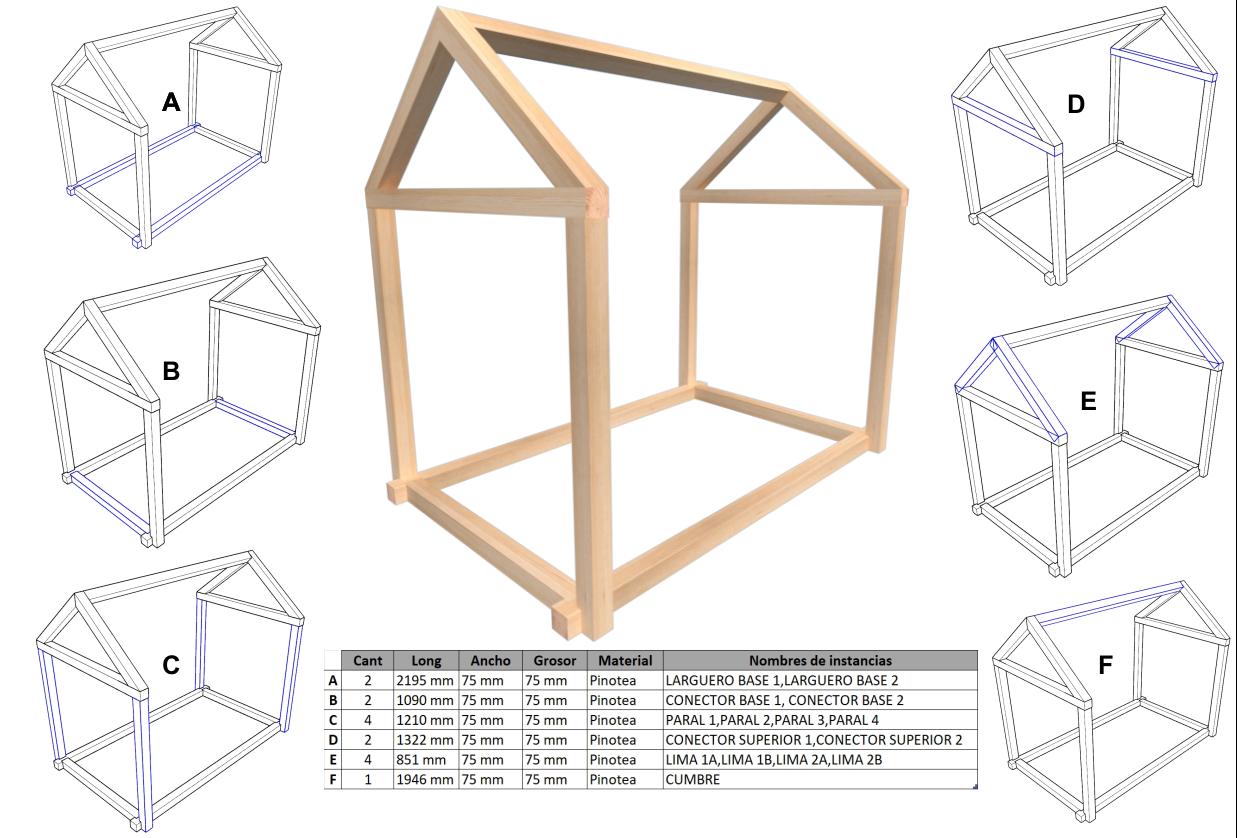
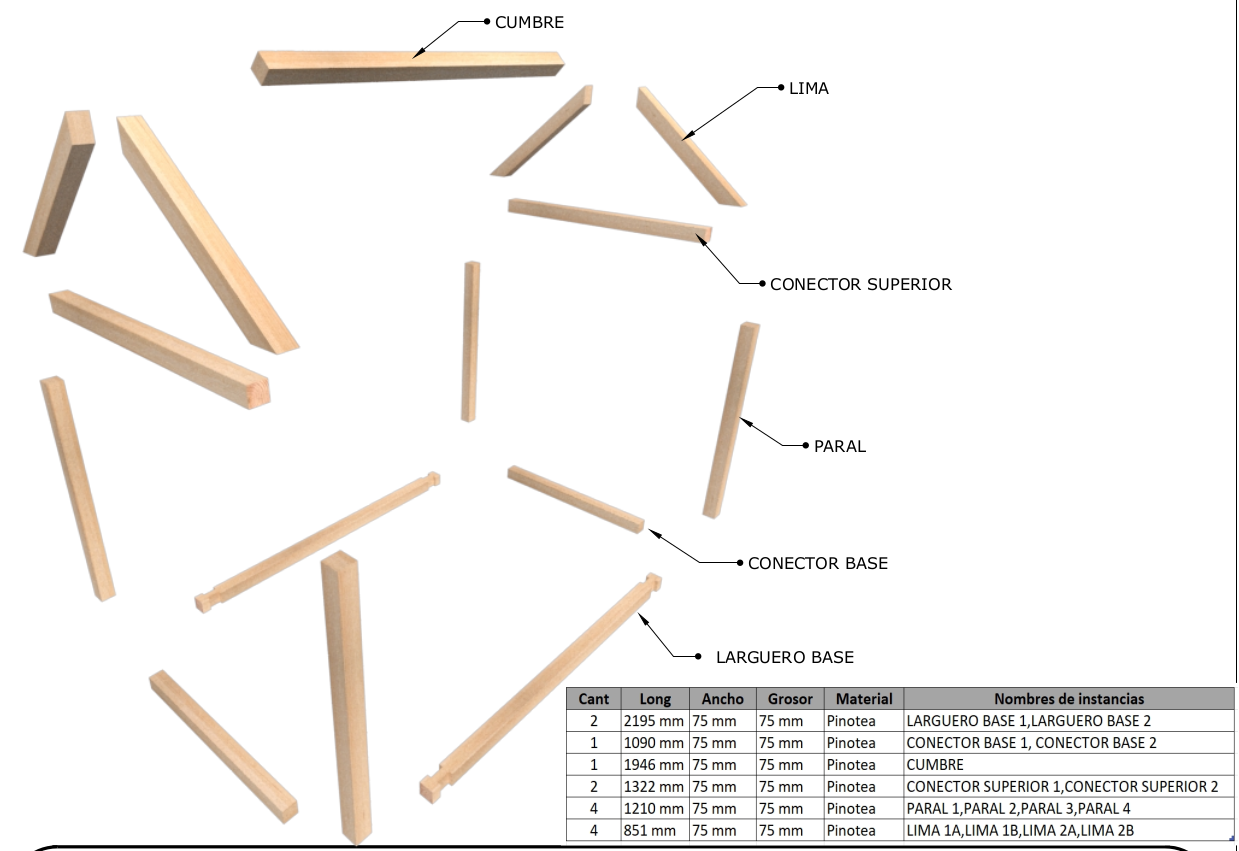
Materials / Materiales
Step #1 Dimensioning. (Minutes 0:00 - 1:15)
We start with dimensioning. I planned to use my new workshop at home and mostly hand tools, but my father-in-law was visiting, and I had only one week to finish it.
Just as I started, my dust collection system broke, so I asked my friend Andrew if I could use his workshop.
Each beam was originally 9.5 to 10 cm wide and high and 2.45 meters long. In the end, I brought them all down to 7.5 cm x 7.5 cm. Always looking for the largest measurement that would work for all of them.
I won't lie, using the workshop probably saved me weeks of work, but you can achieve the same result with a hand plane and a circular or band saw.
I promise to find a good video for you to see how to do this, and if I can't find one, I'll record one myself.
It's always interesting to me when I see workshops without a jointer; it's the heart of a workshop, and without it, it's nearly impossible to achieve perfect edges. If it's a home workshop, it's better to have a good No. 7 or 8 plane, also known as a jointer planer.
After flattening two sides, we move on to the electric planer and table saw. In this workshop, the electric planer had an excellent finish, so I decided to do the remaining two sides with it as well. I would do this last step with a circular saw if I were at home.
Step #2 Final Measurements. (No video)
I didn't manage to record this part, but you have all the final measurements in the PDF. You can make the cuts and joints with a circular saw and chisels (or a router).
Step #3 Edges (Minutes 1:15 - 1:30)
I used a router with a quarter-round bit to have curved and smooth edges. You can achieve the same result with sandpaper or a spokeshave plane, which saved me a lot of work later on.
Step #4 Triangular Bases (Minutes 1:30 - 6:30)
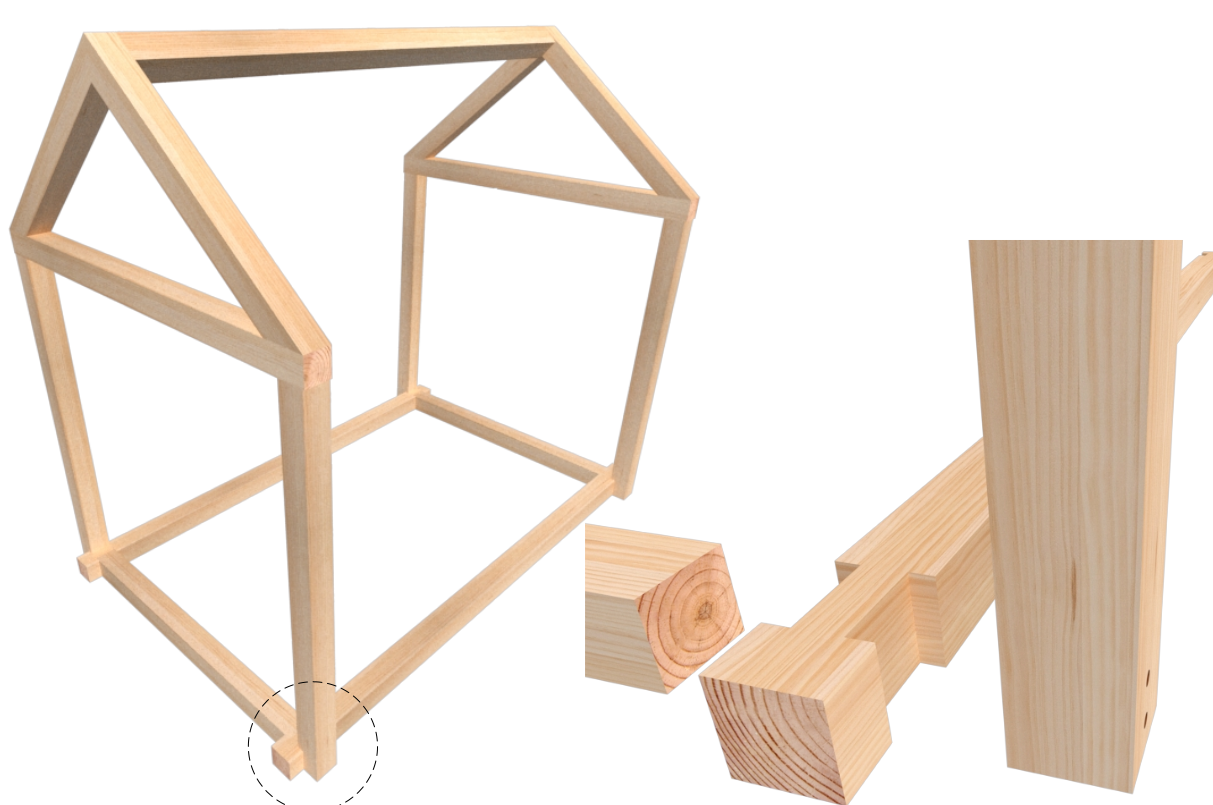
With all the material flattened and cut to size, I started by gluing the triangular bases of the bed. I used a miter joint with two independent wooden inlay keys. The inlay keys are made of cocobolo, and I cut them to the thickness of a saw blade, about 1/8 of an inch, so I could use my circular saw.
If I were to do it again without rushing, I would definitely make a jig to make this cut perfectly straight. But the result is consistent and worked perfectly. In woodworking, you often have an open book to improvise as long as you know the basic rules of the game.
Then, I added round dowels with a one-inch diameter that allowed me to remove the upper triangular base of the bed without using screws or glue in case I wanted to move it in the future.
I used epoxy to join the two short sides of the triangle with their base. Epoxy helped me speed up the process and finish it quickly. Also, I don't trust joints of this type where the end grain of the wood is exposed. It's never a good idea to use this type of joint (butt joint) without any mechanical fasteners or dowels. In this case, the epoxy and some screws do the trick.
Step #5 Legs (Minutes 6:30 - 7:00)
Finally, I made the holes where the upper triangular base's dowels would rest. I made sure they were decently level and gave them extra depth to avoid any fitting issues. For example, the dowels protruded from the triangular base by 5 centimeters, so I made the holes in the legs 7 cm deep.
If I had more time, I would have made the dowel and base joint together with the hole for each post or leg to ensure a perfect fit. But I tried to keep this project as simple as possible.
Step #6 Sanding (Minutes 7:00 - 7:30)
My father-in-law sanded all the pieces as I handed them to him. It was his first time working on a woodworking project like this, and he did an excellent job!
I recommend not skipping any steps in sanding. Start with #80 grit, then move to #120, and continue with each step up to #220 or #320. This depends on the finish you decide to use.
Step #7 Dry Assembly (Minutes 7:30 - 9:10)
We dry-assembled all the pieces and made the necessary adjustments. The alignment of the upper triangle base with the posts or legs gave us some alignment problems. Still, we quickly solved them by shaving off some material from the wooden dowels.
We used wood screws to secure the pieces, but we didn't use glue. The idea is to be able to disassemble the bed easily. You can always use more advanced joinery techniques, but this wasn't the project for that.
Once everything was in position, we disassembled and marked each piece to identify them when assembling in the final place.
Step #8 Finishing (Minutes 9:10 - 9:35)
Then we applied the finish. In this case, we used Odies Oil with white pigment. You can use any finish you prefer. We prefer non-toxic finishes, especially when it comes to products for children or home use.
Step #9 Final Assembly! (Minutes 9:35 - 10:32)
After that, we assembled it with the help of my daughter, who was the star assistant, and my wife added some lights for the finishing touches!
I hope you enjoyed this article, along with the video!
Remember to subscribe to our newsletter, and if you want to support more articles like this, you can purchase the detailed plans that will help you complete this project on your own! There, you'll find all the measurements and several illustrations that will facilitate the construction.
Montessori Bed Plans / Blueprints
The pdf includes :
- All measurements
- Detailed views from every angle
- Final measurements part list
- Assembly steps
Thank you for reading and being part of the #JEFHWoodshop community. Don't hesitate to reach out to us if you have any questions!
Javier y José Feliu
